Machine Parts For Reuse Newsgroup Discussion Forum > Large Size Parts
> Used
> Electrical
> Super gyros professional plastic electric gyros knife
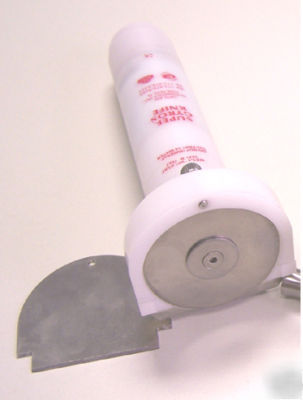
Super gyros professional plastic electric gyros knife
New, Super Gyros Knife Electric Professional-Plastic
This is Not a toy, do not fool around in the kitchen, while another person is holding or using the knife.
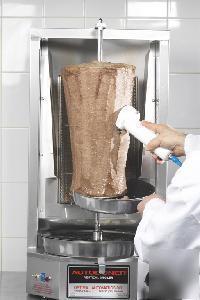
For use when making: GYROS, SHAWARMA and Tacos Al Pastor. Sandwiches are a lean blend of specially selected portions of beef, lamb, pork or in a combination. These great sandwiches can also be made with seasoned chicken. The seasoned meat is broiled on The Autodoner seared and cooked to seal the meat juices and flavor inside.
The Super Gyros Knife - 1 year limited warranty from the mfg, not us. (please allow 1 to 2 weeks for us to process your order for this NEW item.)
( WE sell all 4 models of Gyros Machines-if you need one! )
The Super Gyros Knife is a simple, reliable and easy to use tool, but it is essential to know how it works in order to get the best from it. The blade is made from hardened stainless steel for long life and durable sharpness. This is driven by a small but powerful motor contained in the handle and connected to the blade via a shaft, running in twin stainless steel ball bearings, and a self-aligning coupling.
Plug lead gently into the transformer socket. Hold the unit in one hand at the correct angle to the meat surface (80-85 degrees). Press and hold button and bring unit smoothly into contact with meat, using your whole arm NOT just the wrist. Pull the unit gently down the gyros cone, forming a long strand of meat. Remove unit from the meat BEFORE releasing the button. Safety Precautions: Do not use in damp or wet areas Do not immerse the whole knife in water- Please see instructions for cleaning on page 2 Do not disassemble the handle or transformer unit. In the unlikely event of a problem, consult Optimal Automatics, Inc. Handle the unit with care- the blade is extremely SHARP! Use only in accordance with these instructions
Keep away from children For use only by trained personnel Cleaning Instructions: Remove head from handle. Remove cap by unscrewing the thumbscrew completely. Wash head unit and cap in hot water using mild detergent. Occasionally remove the blade for more through cleaning. See page 3 diagram. Shake off any excess water and allow to dry completely. Replace cap and thumbscrew. Carefully engage plastic drive coupling onto motor coupling in handle, and screw head back onto handle-
DO NOT USE FORCE- it should go on easily! Lightly tighten. Disassembly Head unit: (Refer to diagram on page 3) The head assembly consists of the following components: 1 Head (item 9) 1 Cap (item 15) 1 Cap retaining screw (item 16) 1 Blade (item 10) 1 Washer (item 11) 1 Button head screw (item 12) 1 Blade guard (item 13) 2 M4x8mm cap head screws (item 14) 1 Bearing assembly 2 Bearings (item 2) 1 Bearing spacer (item 3) 1 Spindle (item 1) 1 Spindle coupling (item 5) 1 M4x6mm socket set screw (item 7) 1 Drive coupling (item 6) 1 Spindle circlip (item 4) Sharpening the Blade: With the blade spinning, hold the sharpening stone provided against the blade at the correct angle and apply light pressure. Only sharpen on the beveled side. Always sharpen before the blade gets too blunt to cut effectively. With proper use i.e. only cutting correctly cooked meat, and with proper sharpening, the blade should last a long time. Replacement blades are available from Optimal Automatics, Inc. Blade Removal: Remove cap by unscrewing cap retaining screw. Remove button head screw using 3mm Allen Key. Lift off blade. Take care! The blade is sharp! Note the bearing assembly is sold as a unit. It is therefore unnecessary to disassemble this unit. However, in the unlikely event of a drive coupling needing replacement, simply remove the M4x6mm grub screw, which loosely retains the coupling, using a 1.5mm Allen Key.
Do not over tighten on replacement! The drive coupling should be loose . This is normal to allow for any coupling misalignments. Assembly Head Unit: The main reason for disassembly and assembly of the head unit is for cleaning and blade replacement. Blade Assembly: Locate the blade over the D shape with the bevel on the blade facing down. Some play in the D is normal.
Fit the penny washer and screw in the M5x8mm socket button head screw using a 3mm Allen Key. Hold the blade carefully while tightening the screw! Blade Protector: Fit the blade protector (guard) using the two M4x8mm socket cap screws. DO NOT over tighten. Adjust for meat slice thickness by sliding up or down as required. All this info, is from the package, in the box, for both models of gyros elec. knives.